Introduction
This is a series of tutorials and practical flying exercises prepared by CIX VFR Club to introduce members to online ATC and to enable them to learn at their own pace how to use it. Each lesson consists of a Groundschool section on aviation law and theory, and a practical exercise.From lesson 6 onwards, a discussion on flight planning is included and the practical exercise is a flight using the information in the lesson.
Congested Airspace
Lets now move to a slightly more exciting environment. For this lesson, you will fly from Biggin Hill to Stapleford, north of the Thames 'have lunch' and fly back again. For Biggin Hill, the Club has some special CIX VFR Club scenery, with Office, Clubhouse and Members Bar, parked vehicles, a lorryload of chairs being delivered and a summer barbecue in progress under a striped canvas awning. It isn't essential, but it makes for a more welcoming start. There are versions for use with FS9, FSX, photoscenery and default scenery.
Biggin Hill Aerodrome, as it was in World War II, played a significant part in the Battle of Britain. Today, known as London Biggin Hill, it is in surrounded by air traffic going into and departing Gatwick, Heathrow, and London City plus military traffic not too far away at Farnborough. That is without accounting for the hundreds of light aircraft movements at surrounding General Aviation aerodromes such as Rochester, Manston, Redhill, Headcorn, Blackbushe etc.
This means that the airspace in this part of the South East is more congested than average, with a lot of controlled airspace to protect the traffic using the major airports where VFR traffic is not welcome. Nevertheless, flying out of Biggin Hill is really no more difficult than flying out of Gloucestershire. You just need to study the chart more carefully to identify the places where you would not be welcome, or are simply not allowed.
Groundschool
By now, with two previous flights under your belt, you should be getting the hang of things. Remember that preparation is very important, so i make no apology for a considerable amount of it.
Reading
For this flight you need to understand the various types of Controlled Airspace and how they affect VFR pilots. This is fully explained in Chapter 1 section 7 of the Club's Radio Telephony Manual which may also be found on the web site. Make sure you know the definitions of, and differences between Control Areas (CTAs) Control Zones (CTRs), Terminal Manouevring Areas (TMAs), and Aerodrome Traffic Zones (ATZs).
Chapters 2 & 3 of the Radio Telephony Manual contain the information about ATC procedures. By now you should be beginning to remember at least part of these. In particular, rehearse the CEPHACER airborne flight plan call covered in Chapter 4, section 6. You will be making that call at least once on each of the two flights. This subject is also covered in Lesson 6 of this Online Flight Training Guide. Reading these documents will prepare you for the Air Traffic Control element of the flight.
A useful tip is to write out on separate cards the ATC dialogue you can expect for arrival and departure, plus the CEPHACER airborne flight plan call. Then you can simply read what's on the card if you get stuck. At first daunting, talking to ATC really does become much easier after a fairly short time.
To help planning the flight, study exercise 18d section 4 of the CIX VFR Club Flight Training Manual. To help departure and arrival procedures at the aerodromes, study exercises 20, 21 and 22 of the club's Flight Training Manual.
The essential ATC dialogue for this flight is included later in this lesson, but you should also read Chapters 1, 2 and 3 of the Club's Radio Telephony Manual which may also be found on the web site.
As a new pilot, be aware that most controllers you are working are unlikely to be as inexperienced as you, although some may be. Obey their instructions, and ask for help if you are unsure of what to do. You can also put 'Student Pilot - first on line flight' in your flight plan. Also, read the Club 'Code of Conduct' document accessed from the Membership page of the web site. It contains a lot of useful advice.
The Chart
A Lot of Controlled Airspace
The chart is a bit cluttered in this area of England, so study it for a while - perhaps quite a long while, as there is a lot of important information to be gained from just this small area.
At the top of the chart segment, you will see part of the blue boundary line of Stansted's CTA just north of Stapleford aerodrome. Prominent in the centre is London City's Control Zone (CTR) extending from the surface to 2500 feet and the narrow strip all round which is its Control Area (CTA), extending from 1500 feet to 2500 feet.
To the north and west of Biggin Hill is the conurbation of London itself, and to the south, just right of Godstone VRP, you can just see the northern tip of Gatwick's CTA.
But also notice the purple line just east of Stapleford, near the top right hand corner, forming a sideways 'V' shape with the legend "LTMA A 2500'+" running parallel to the line. That signifies that the London Terminal Manouevring area covers the whole of this area from 2500 feet upwards, like a huge blanket. The A means that it is Class A airspace. The '+' means that the top of the TMA is at the base of the Upper Airways System, i.e. 24,500 feet.
Controlled Airspace
Typical Controlled Airspace Profile around
London City can be seen below left.

Having revised the definitions of Controlled Airspace, you know the difference between a TMA, a CTA and a CTR. In this part of the UK there is a lot of controlled airspace. Examine each area in turn to understand what information the chart is providing. The Stansted and Gatwick Control Areas are there to protect the IFR traffic using those airports. They both extend from 1500 feet (above sea level) to 2500 feet, where they meet the base of the London TMA. They are both Class D airspace, and you may enter those areas with permission from ATC. However if you are flying to or from Biggin Hill aerodrome, there is no reason for you to enter those areas, and they would much prefer that you kept away from their big aeroplanes.
What is particularly important about the Gatwick Control Area (CTA) is that if you continue climbing out of runway 21 at Biggin Hill, you will enter the Gatwick CTA. You are allowed to go there, but only with permission, so if you accidentally (or carelessly, to be more precise, in most situations), stray into (the official term is 'infringe'; the popular word is 'bust') the Gatwick CTA, you can expect a terse message from the Controller, usually as a private text message.
The same rules and conditions apply to London City Airport to the north west. You may enter London City Airport's Control Zone (CTR), with permission from ATC, but you really have no reason to, and they'd rather you didn't.
To cap it all, literally, there is the London Terminal Manoeuvring Area (LTMA) over the top of the whole of this area with its base at 2500 feet as mentioned above. It is not immediately obvious, because the boundary and the associated legend on the map are not immediately adjacent to Biggin Hill. This large area of Class A airspace is designed to protect IFR traffic flying into Heathrow, Gatwick, Stansted, Luton, London City and Biggin Hill. It starts well above ground level, because the airports below it are protected where necessary by smaller areas of Class D controlled airspace, as you have seen. The base of the TMA is lowest near these airports and is higher the further away you go from them. The upper limit also varies, but we aren't interested in that because, being Class A airspace, as VFR traffic you cannot go there, ever.
There isn't always a lot of room vertically either. If you are observant, you will also note that Biggin Hill really is on a hill, signified by the brown colour running east-west. Beneath the airport name is a number "598", which is the airfield elevation above sea level. Fly low in bad weather and you could easily fly into Biggin Hill, the hill, not the airfield.
When flying at 1000 feet above the airfield in the visual circuit at Biggin Hill, you are 1600 feet above sea level, and just 900 feet below the London TMA. That is the main reason why overhead joins are never permitted at Biggin Hill. You cannot legally fly 2000 feet above aerodrome level for an overhead join, because that would put you 100 feet inside the London TMA.
These areas of controlled airspace, plus the vast conurbation of South London to the west do restrict where you can fly from Biggin Hill. However, because the Club has a base there, you are likely to fly in and out of Biggin Hill quite a lot, and you will quickly get used to the constraints.
It is probably also worth pointing out in passing that the controlled airspace round London Heathrow is Class A right down to the surface. You cannot go there at all flying VFR. In the real world, single engined aircraft are not permitted to land at Heathrow either, so on VATSIM too, Heathrow is out of bounds for Club pilots except IFR in a twin - and it needs to be a fast one with all those 747s up your tail!
Back to the Chart.
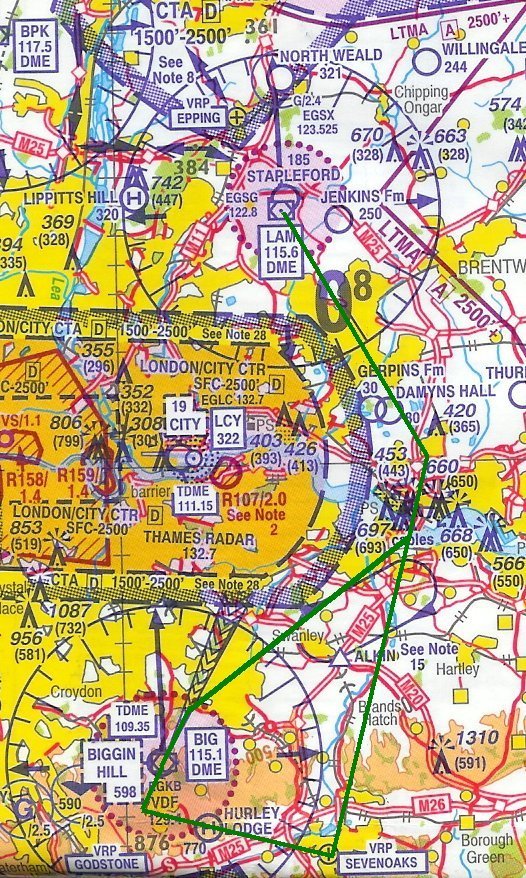
First, find Biggin Hill and Stapleford aerodromes. That gives you the first piece of information - you are going to be flying north, and then on the return trip, south.
The most obvious feature of both Biggin Hill and Stapleford, is that they both have VOR radio navigation beacons located on the airfield. At Biggin Hill it is Biggin (BIG), frequency 115.10 and at Stapleford, Lambourne (LAM), frequency 115.60. You can use these VORs to find the aerodromes in poor weather, although this benefit should be used with caution. (For a treatise on instrument flight, see the The IMC Rating on the Club web site). If you have the full chart, you can see that the Stansted and Luton CTAs are very close to Stapleford. Note the narrow gap between these two areas. It wouldn't be good to get lost around there.
There are a few other locations that you should identify on the chart, as they will be important for this flight. These are:-
- The town of Sevenoaks, about 7 nautical miles (nm) south east of Biggin Hill.
- The A20/M25 junction at Swanley, 6nm north east of the field.
- Dartford Crossing 12nm north east, on the Thames, identified by 4 blue sharp pointed triangles clustered together. These triangles signify Air Navigation Obstacles (ANOs) and in this case are the towers of Dartford Bridge.
- Stapleford aerodrome, already mentioned, 11nm north west of Dartford Crossing, and easy to spot as it has the large VOR compass rose over it for Lambourne (LAM) VOR. (Also handy for finding the airfield in poor weather).
So you need to study the chart well, and in particular, have it handy, opened at the right place, when flying round Biggin Hill. The more you become familiar with where you can go safely and legally, the more relaxing your flights out of and into Biggin Hill will be.
Congested Areas
What would happen if you were flying over London and your engine stopped? The chances of landing on a house or on a busy road are probably about 90%, with doubtless a tragic outcome for someone, if it were the real world. So common sense tells you not to fly over London in your C172. In fact Aviation Law also prohibits it.
An aircraft flying over a congested area of a city town or settlement shall not fly below such height as will permit, in the event of a power unit failure, the aircraft to land clear of the congested area
This is Rule 5 of the Rules of the Air and is often quoted by real world and VATSIM VFR pilots as a reason for flying round Manchester, Birmingham etc., rather than over them. The humble Cessna would need to be awfully high to be able to glide clear of a city extending 30 miles across! In the Club, although there is no VATSIM rule equivalent to Rule 5, we do tend to obey it. Typically in English Law, a congested area is not precisely defined, but you can take it as meaning any place where there are more than a few houses.
To give you an idea, a Cessna 172 has a glide ratio of about 1 in 9. So if your engine were to fail at a height of 2000 feet above ground level, then you will travel about 18,000 feet horizontally (3.4 miles) before you run out of sky. From this, it follows that it is illegal to fly over the centre of a town 6.8 miles across or more, at 2000 feet or below. So very often you will be safe and legal flying over most small towns and villages. However, in the Greater London area you do need to keep in mind where it is safe to fly to comply with rule 5.
Flight Planning
Research
From Biggin Hill, going north, there are a few pieces of information you should know. How do you get to know this information? One way, as you would in the real world, is pop into the Clubhouse and ask a fellow pilot. In this case go to the Club Forum, Members Bar section and ask, “What do I need to know as a new pilot departing Biggin Hill.” Here are a few of the answers you may get.
You'll find most of the information you need by reading Rich Keen's excellent tutorial on flying from and to Biggin Hill.
The preferred departure runway at Biggin Hill is 21.
You cannot climb above 2500 feet in the Biggin Hill area, because, as mentioned above, the base of the London TMA is at 2500 feet here. For safety, general practice is to stay at 2400 feet or below.
Your take off clearance will be "maintain runway heading for 2 miles before turning left, not above 2400 feet. Report overhead Sevenoaks". This is to avoid overflying Biggin Hill Village. Your clearance includes a warning about your 2400 foot 'ceiling' and gives you an outbound reporting point where Biggin Approach will hand you over to Thames Radar, if they are on line.
There is a mast 876 feet high (above sea level) almost on your climbout path and about 3 miles from the airfield (the height is shown on the chart, but the actual mast isn't because of the clutter of other detail). Make sure you don't hit it, but you should see it clearly as you climb.
After reporting at Sevenoaks, you may be asked to further report at the M20/M25 junction near Swanley.
You will be asked to report at Dartford, identified by the 'Queen Elizabeth II' suspension bridge crossing the Thames at that point. You should also see the M25 disappearing under the river into the famous (or is it infamous?) Dartford Tunnel.
If Thames Radar is on duty, and they often are when Biggin Hill is manned, (check Servinfo) you will be handed over to them as you turn north from Sevenoaks.
If Biggin Hill is not manned, but Thames Radar is, then Thames will provide ATC services for Biggin Hill.
In a similar manner, you need to find out as much as you can about Stapleford. Just to get you started (you can do your own research this time) it has two grass runways 10/28 and 04/22. The latter is divided into left and right sections, and the right section has a narrow asphalt section in the centre of the northern 600 metres. The 04/22 runways are on a significant upslope to the south (70 feet in the runway length, which affects which runway is in use. If winds are light, you may be asked to land on 22 uphill, but take off on 04, downhill. The 10/28 runway has an upslope to the east, but it is only 25 feet in the runway length. Go to the NATS website for the rest of the information you need, plus, again, asking in the Club Members Bar forum.
Pen to Paper
Now get out your chart or map and plot the route you are going to take. Fairly easy, isn't it. From Biggin Hill, fly straight ahead for 2 miles, turn left to Sevenoaks, turn left again and head for Dartford Crossing, then turn left again direct to Stapleford. You draw your line on the chart and start to think about the bearings for each leg, when someone says to you, 'but what if the departure runway is 03?' Ask someone again of course. Don't worry about this, as everyone has to ask these things for the first few flights, or when visiting an unfamiliar area. Taking off from runway 03, you would normally be asked to report at the Swanley M20/M25 junction, where you would be handed over to Thames Radar, if they are on duty. Then you would route to Dartford. Swanley junction coincides with ALKIN as you can see on the half-million chart above. This is a GPS reference point used by London City and Biggin Hill for Instrument Approach procedures.
So you need to have at least two flight plans prepared. At least two, because the runway in use could be 11 or 29. Have a guess at what the initial reporting points would be if taking off from either of these two runways. So you draw 4 lines on the chart from Biggin to Dartford, and thankfully just one from Dartford to Stapleford.
There are alternatives.
- Prepare 4 flight plans, but only draw the track line on the chart once you know the runway in use, given on Servinfo from the airfield ATIS.
- You could request a departure from the overhead (remember the Flight Training Manual Exercise 18?) Then you would route from the overhead direct to the M20/M25 junction at Swanley, and onwards to Dartford.
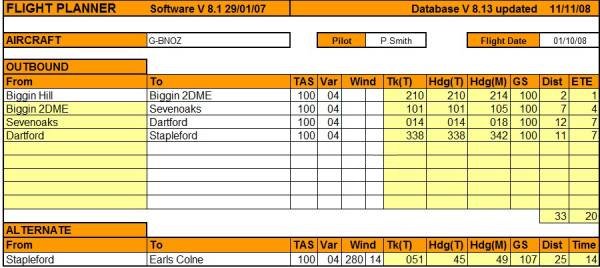
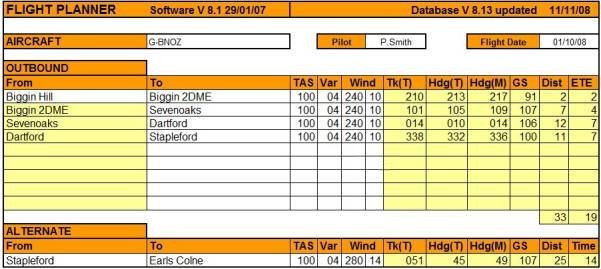
Once you have decided, draw your track line, measure your distances, get out the protractor and measure the bearings (Flight Training Manual Exercise 17). Or use the spreadsheet flight planner which you can download from the Club web site.
The 2 DME turning point outbound from runway 21, the Sevenoaks VRP and Dartford Crossing are already in the Flight Planner database (Version 8.13 or later), but you may need to enter the M3/M25 junction in the User waypoint section. The easy way to do this is to select the database sheet then press Ctrl-F and enter all or part of the name in the search box. If you choose to use this spreadsheet planner, the distances and bearings are calculated for you, and a Pilot's Log sheet is created for you to print out. An example of the flight departing from runway 21 is appended to this tutorial.
Practical
Rehearsal
Before you take to the skies, think through what will happen on the flight. Be Prepared is as good a motto for pilots, even simulating ones, as it is for Boy Scouts. So for this flight, you might prefer to do a 'dry run' off line. Make sure you log your progress on your PLOG - take off time, your times overhead Sevenoaks and Dartford, then your landing time. When you fly the trip on line, make sure too that you put 'CIX VFR Club Student Pilot' in your VATSIM Flight Plan.
Before doing anything else, save a flight at Biggin Hill. If you don't have the Club's special Biggin Hill Clubhouse scenery installed, park near the tower on the main apron. If you have installed the Club's special Biggin Hill Clubhouse scenery, excellent! Park near the Clubhouse. Whichever option you have chosen, save the flight, and tick the 'Make this the default flight' box. This is so that, if FS crashes or locks up, when you restart, you will be automatically placed back at your start for this flight, either the main apron or the Clubhouse.
Checklist
Don't forget to work through your checklist, and have a drink handy. Online flying is thirsty work with all the tension of new experiences.
Departure
Taxi as instructed to the hold for the appropriate runway. As you have anticipated, when you call 'Ready for Departure', you will be given a clearance 'After departure...' etc. Read that back and when cleared for takeoff, switch on 'Mode Charlie' in FSInn or Squawkbox as you enter the runway. Then off you go to Stapleford. (There's no need now to include every radio call in this document, is there?).
En Route
As you climb out (assuming runway 21) you see the mast directly ahead, and you watch your heading for drift and your altitude as you head towards it. Approximately one minute 20 seconds after take off, start your turn. At this point, your altimeter will probably indicate about 2200 feet with QNH set. Remember not to climb above 2400 feet to stay out of the London TMA above. You have obtained your headings either by measurement or by using the Club flight planner, so if you have made your turn accurately, Sevenoaks should appear on the nose, and you will pass overhead about 5 minutes after takeoff in nil wind.
Turn onto your heading for Dartford and when wings level, report to ATC that you are at Sevenoaks, and listen carefully to ATC's reply, and note down as much as you can. Don't be afraid to ask him to repeat his message.
Biggin Approach Golf Oscar Zulu, say again.
He will not be at all surprised if he knows you are a new pilot. Make your turn before talking to ATC in case you can't get to speak to him immediately because of other traffic. If you delay your turn, then your heading to Dartford will not be correct. If there is a delay, you can always say
Biggin Approach Golf Oscar Zulu, now 3 miles north east of Sevenoaks
Biggin will tell you to call your en-route frequency. If Thames Radar is on line, tune your radio to them. The frequency will be shown in Squawkbox (main window, right hand panel) or FSInn's ATC window. When you contact them, you will need to give the CEPHACER routine, so you need to know your position reasonably accurately. '5 miles north of Sevenoaks', '3 miles east of Swanley' etc. If you don't include it in your CEPHACER call (the second 'E' stands for 'Estimate') Thames may also ask you for an estimated time of arrival (ETA) at Dartford, often phrased simply as: -
Golf Oscar Zulu, what is your estimate for Dartford
Your flight plan shows the elapsed time to each waypoint, so if you have been airborne 7 minutes, and your ETA at Dartford from the flight planner is 12 minutes you can reply
Biggin Approach Golf Oscar Zulu estimate Dartford in zero fife minutes
Roger Golf Oscar Zulu, report Dartford
Report Dartford, Golf Oscar Zulu
If Thames Radar is not on line, then monitor the text-based Unicom frequency.
Dartford Bridge is very obvious in FSX, and also FS9 with Service Pack 1 which added a lot of bridges to the scenery. In anything like reasonable weather you will see it from 10 miles away or more. Take care not to drift west of the bridge though, and risk infringing London City airspace. Overhead Dartford, you report the fact to Thames Radar, then change heading for Stapleford. Most importantly, check your watch and note the time overhead Dartford. Your estimated time en route (ETE) from Dartford to Stapleford is only 7 minutes at 100 knots. So if you were to fly the Stapleford heading for 9 minutes, you would 'bust' Stansted's airspace if you are above 1500 feet. Mindful of this, keeping your eyes peeled, after about 4 minutes from Dartford you should see Stapleford ahead fairly clearly.
Arrival
However, before leaving Biggin Hill, you should have planned your arrival. Assuming that the wind is from the southwest, then you would reasonably expect runway 22 to be in use. So you can either make an overhead join, or join left hand downwind, which would be easier. There will almost certainly be no ATC at Stapleford, but if Stansted is on line, you might be asked to contact them. They may choose to ask you to report your position in the circuit, as if they were actualled controlling at Stapleford.
As you approach Stapleford, at about 2.5 miles away, descend to 1200 feet to put yourself at circuit height (Stapleford is almost 200 feet above sea level) and turn onto a heading of 040o. That will position you downwind for runway 22. Fly the rest of the circuit and land as normal.
You may have found that flight a little stressful, but once you have flown a few similar flights, the satisfaction of doing it well and having the added realism factor of live ATC overcomes the terror!
Now Go Back Home
You should be able to plan the flight back to Biggin Hill yourself. Go back exactly the same way and keep an eye on your altitude. Call Biggin Approach at Dartford for joining instructions, which will be similar to those you received from Gloucestershire, except that you will not be offered an overhead join. If runway 21 is in use, expect a left base join, but be prepared for any option.
Good luck.